Here I write a tutorial for you guys.
troubleshooting:CHECK failed - HEF file length does not match (status = 26), that because your host HailoData Compiler is not suitable with Pi5 HialoRT.
1 Like
And when you meet error like can not find dateset please check hailo_model_zoo/docs/DATA.rst at master · hailo-ai/hailo_model_zoo · GitHub to install dataset and copy dataset to the folder, if the folder is not exit please make one.
Some time you will find error like no alls, just do like this:
git clone https://github.com/hailo-ai/hailo_model_zoo/tree/master
cd hailo_model_zoo
Then copy hailo_model_zoo floder to the error folder
1 Like
I tried to use the tutorial. Instead of yolo8, i changed the lines to “yolo5” (I dont know if I can do this or not). then after going forward line by line according to the tutorial, when do " ```
bash run.sh object-detection-hailo
gst_parse_error: no element "hailonet" (1)
hailomuxer name=hmux filesrc location=./video/detection0.mp4 name=src_0 ! queue name=queue_dec264 max-size-buffers=3 max-size-bytes=0 max-size-time=0 ! qtdemux ! h264parse ! avdec_h264 max-threads=2 ! video/x-raw,format=I420 ! queue name=queue_scale max-size-buffers=3 max-size-bytes=0 max-size-time=0 ! videoscale n-threads=2 ! queue name=queue_src_convert max-size-buffers=3 max-size-bytes=0 max-size-time=0 ! videoconvert n-threads=3 name=src_convertCan you please help me with this error?
Hey @jiahao.li even though some issues are being reported on the tutorial, I want to thank you very much for putting this information out there. You are helping the community greatly with this content.
3 Likes
Input this command and show me result
hailortcli fw-control identify
and
lspci | grep Hailo
narges@raspberrypi:~ $ hailortcli fw-control identify
[HailoRT] [warning] Unsupported firmware operation. Host: 4.18.0, Device: 4.17.0
Executing on device: 0000:01:00.0
Identifying board
Control Protocol Version: 2
Firmware Version: 4.17.0 (release,app,extended context switch buffer)
Logger Version: 0
Board Name: Hailo-8
Device Architecture: HAILO8L
Serial Number: HLDDLBB242602014
Part Number: HM21LB1C2LAE
Product Name: HAILO-8L AI ACC M.2 B+M KEY MODULE EXT TMP
narges@raspberrypi:~ $ lspci | grep Hailo
0000:01:00.0 Co-processor: Hailo Technologies Ltd. Hailo-8 AI Processor (rev 01)
narges@raspberrypi:~ $
I still get this error with hailonet.
It worked for me, but by using the provided models like yolov8n. Can you please let me know if it also works for yolov5 or not? i tried to use my yolov5 model, it didnt work.
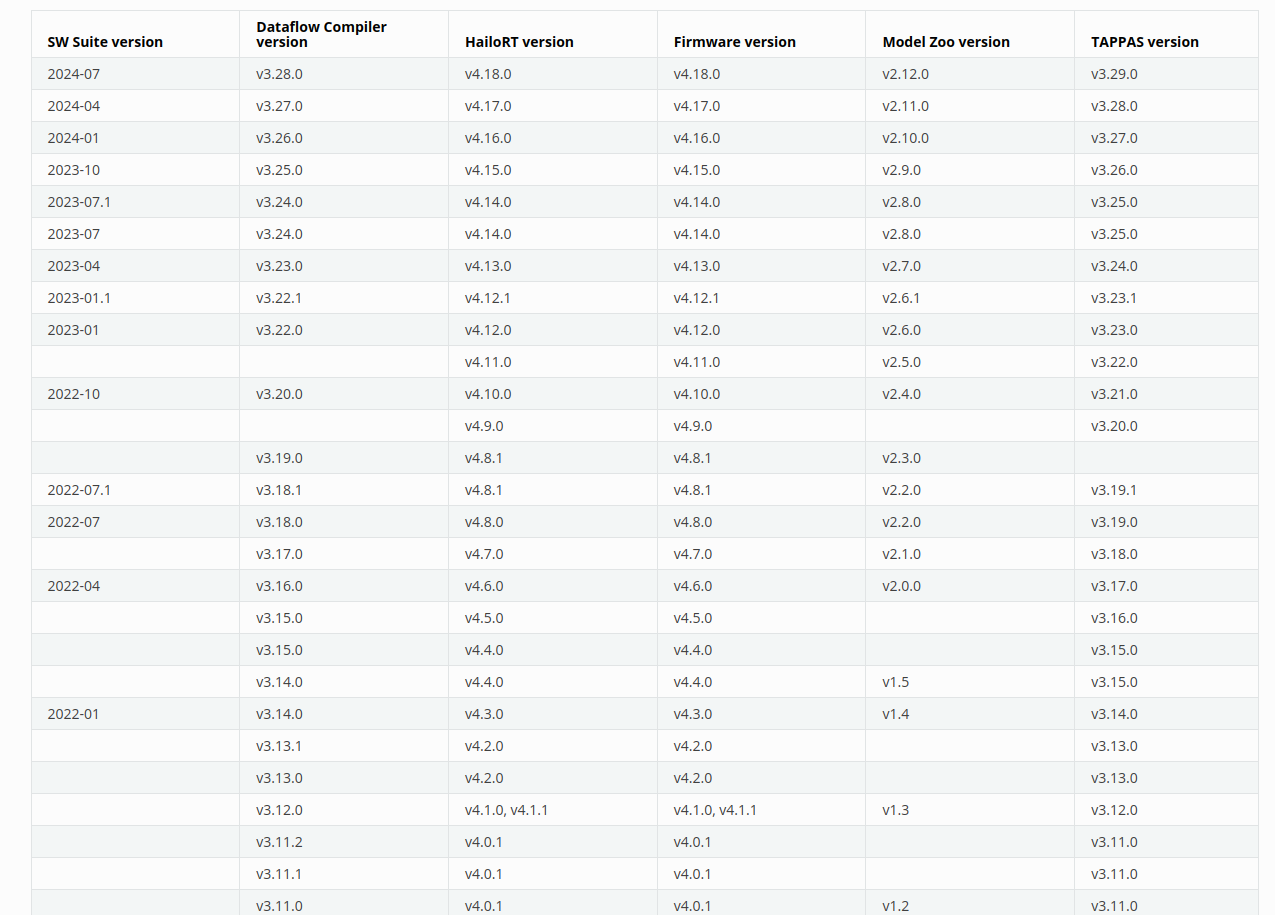
The versions are now the ones its is mentioned in the image. When i used a provided model yolov8s, the codes runs successfully and detects the objects. But when i want to use my own model (yolov8n), i get this error. This is the information of both models. can you please help me with this error?:
(Hailo Detection App:11409): GStreamer-Base-CRITICAL **: 19:45:39.645: gst_queue_array_push_tail: assertion ‘array != NULL’ failed
narges@raspberrypi:~/Benchmarking-YOLOv8-on-Raspberry-PI-reComputer-r1000-and-AIkit-Hailo-8L $ hailo parse-hef ./hailomodel/yolov8n.hef
(hailo) Running command ‘parse-hef’ with ‘hailortcli’
Architecture HEF was compiled for: HAILO8L
Network group name: yolov8n, Multi Context - Number of contexts: 4
Network name: yolov8n/yolov8n
VStream infos:
Input yolov8n/input_layer1 UINT8, NHWC(640x640x3)
Output yolov8n/conv41 UINT8, FCR(80x80x64)
Output yolov8n/conv42 UINT8, NHWC(80x80x1)
Output yolov8n/conv52 UINT8, FCR(40x40x64)
Output yolov8n/conv53 UINT8, NHWC(40x40x1)
Output yolov8n/conv62 UINT8, FCR(20x20x64)
Output yolov8n/conv63 UINT8, FCR(20x20x1)
narges@raspberrypi:~/Benchmarking-YOLOv8-on-Raspberry-PI-reComputer-r1000-and-AIkit-Hailo-8L $ hailo parse-hef ./hailomodel/yolov8s_h8l.hef
(hailo) Running command ‘parse-hef’ with ‘hailortcli’
Architecture HEF was compiled for: HAILO8L
Network group name: yolov8s, Multi Context - Number of contexts: 3
Network name: yolov8s/yolov8s
VStream infos:
Input yolov8s/input_layer1 UINT8, NHWC(640x640x3)
Output yolov8s/yolov8_nms_postprocess FLOAT32, HAILO NMS(number of classes: 80, maximum bounding boxes per class: 100, maximum frame size: 160320)
Operation:
Op YOLOV8
Name: YOLOV8-Post-Process
Score threshold: 0.200
IoU threshold: 0.70
Classes: 80
Cross classes: false
Max bboxes per class: 100
Image height: 640
Image width: 640
Note that your outputs are not the same.
The post process in Hailo-rpi5-examples assumes you have NMS done as part of the HEF.
In order to add it you should add to your alls script a command like this:
nms_postprocess(“…/…/postprocess_config/yolov8n_nms_config.json”, meta_arch=yolov8, engine=cpu)
You can search the alls file in our model zoo github (Not all networks are supported…)
So for examples for yolov8n see:
Note that you can use the original network output without adding the NMS, but, it requires a different post process for each network.
Hi @jiahao.li,
Thanks for the tutorial.
I’m facing the problem stated here.
Would you be able to provide some insights as to how to work around this?
Thank you!
Hi @jiahao.li jiahao, thank you for the tutorial! I want to follow it through, sadly i get stuck at the following step:
Install coco dataset for evaluate/optimize/compile the yolov8n model
python hailo_model_zoo/datasets/create_coco_tfrecord.py val2017
python hailo_model_zoo/datasets/create_coco_tfrecord.py calib2017
calib2017 is nowhere to be found. I found val2017 and it only consists of pictures. I thought maybe train2017 replaced calib2017. But to download it you need 18 GB?! I thought to myself that can’t be… Maybe what you wanted to say with those lines is, that we should use our val and our train folder that we used for our customized model?
So with that assumption i took my val and train folder (just the images) and named them val2017 and calb2017 so far so good…i guess.
Taking a view into create_coco_tfrecord, I don’t really understand what the command “python hailo_model_zoo/datasets/create_coco_tfrecord.py calib2017” does since the folder has just the pictures without the annotations in it.
Let’s have a look at the code, since I am new in the raspberry pi world and have an amateur knowledge in code, could you tell what and how I must adjust the code, so that it will work? For example what does “val2017: models_files/coco/2023-08-03/coco_val2017.tfrecord” even mean? coco_val2017.tfrecord is not located in models_files/coco there are just some uncertainties I have and just wished this step was clearer.
FYI I am working on an raspberry pi customized yolov8s model and want to deploy it on an raspberry pi 5 with a camera module 3 and with the raspberry pi Ai kit somehow I could compile it with this tutorial: Raspberry Pi AI Kit: ONNX to HEF Conversion, but the detection bbox are disoriented that’s why I try to find other ways to convert my onnx to hef but always hit another wall…
here is the code with the tfrecord, I mean I see that annotations is mentioned but I canfigure out, in whhich flder structure it must be saved to be recognized…
#!/usr/bin/env python
import argparse
import collections
import json
import os
import random
import shutil
import zipfile
from pathlib import Path
import numpy as np
import tensorflow as tf
from PIL import Image
from tqdm import tqdm
from hailo_model_zoo.utils import downloader, path_resolver
TF_RECORD_TYPE = “val2017”, “calib2017”
TF_RECORD_LOC = {
“val2017”: “models_files/coco/2023-08-03/coco_val2017.tfrecord”,
“calib2017”: “models_files/coco/2023-08-03/coco_calib2017.tfrecord”,
}
def _int64_feature(values):
if not isinstance(values, (tuple, list)):
values = [values]
return tf.train.Feature(int64_list=tf.train.Int64List(value=values))
def _bytes_feature(values):
return tf.train.Feature(bytes_list=tf.train.BytesList(value=[values]))
def _float_list_feature(value):
return tf.train.Feature(float_list=tf.train.FloatList(value=value))
def _create_tfrecord(filenames, name, num_images, imgs_name2id):
“”“Loop over all the images in filenames and create the TFRecord”“”
tfrecords_filename = path_resolver.resolve_data_path(TF_RECORD_LOC[name])
(tfrecords_filename.parent).mkdir(parents=True, exist_ok=True)
progress_bar = tqdm(filenames[:num_images])
with tf.io.TFRecordWriter(str(tfrecords_filename)) as writer:
    for i, (img_path, bbox_annotations) in enumerate(progress_bar):
        progress_bar.set_description(f"{name} #{i+1}: {img_path}")
        xmin, xmax, ymin, ymax, category_id, is_crowd, area = [], [], [], [], [], [], []
        img_jpeg = open(img_path, "rb").read()
        img = np.array(Image.open(img_path))
        image_height = img.shape[0]
        image_width = img.shape[1]
        for object_annotations in bbox_annotations:
            (x, y, width, height) = tuple(object_annotations["bbox"])
            if width <= 0 or height <= 0 or x + width > image_width or y + height > image_height:
                continue
            xmin.append(float(x) / image_width)
            xmax.append(float(x + width) / image_width)
            ymin.append(float(y) / image_height)
            ymax.append(float(y + height) / image_height)
            is_crowd.append(object_annotations["iscrowd"])
            area.append(object_annotations["area"])
            category_id.append(int(object_annotations["category_id"]))

        if bbox_annotations:
            img_id = object_annotations["image_id"]
        else:
            img_id = imgs_name2id[os.path.basename(img_path)]

        example = tf.train.Example(
            features=tf.train.Features(
                feature={
                    "height": _int64_feature(image_height),
                    "width": _int64_feature(image_width),
                    "num_boxes": _int64_feature(len(bbox_annotations)),
                    "image_id": _int64_feature(img_id),
                    "xmin": _float_list_feature(xmin),
                    "xmax": _float_list_feature(xmax),
                    "ymin": _float_list_feature(ymin),
                    "ymax": _float_list_feature(ymax),
                    "area": _float_list_feature(area),
                    "category_id": _int64_feature(category_id),
                    "is_crowd": _int64_feature(is_crowd),
                    "image_name": _bytes_feature(str.encode(os.path.basename(img_path))),
                    "image_jpeg": _bytes_feature(img_jpeg),
                }
            )
        )
        writer.write(example.SerializeToString())
return i + 1
def get_img_labels_list(dataset_dir, det_file):
with tf.io.gfile.GFile(str(det_file), “r”) as fid:
obj_annotations = json.load(fid)
imgs_name2id = {img["file_name"]: img["id"] for img in obj_annotations["images"]}
img_to_obj_annotation = collections.defaultdict(list)
for annotation in obj_annotations["annotations"]:
    image_name = str(annotation["image_id"]).zfill(12) + ".jpg"
    img_to_obj_annotation[image_name].append(annotation)

no_anns_imgs = 0
orig_file_names, det_annotations = [], []
for img in sorted(dataset_dir.iterdir()):
    if img.name not in img_to_obj_annotation:
        no_anns_imgs += 1
    det_annotations.append(img_to_obj_annotation[img.name])
    orig_file_names.append(str(img))
files = list(zip(orig_file_names, det_annotations))
print(f"{no_anns_imgs} / {len(files)} images have no annotations")
random.seed(0)
random.shuffle(files)
return files, imgs_name2id
def download_dataset(name):
dataset_name = “val2017” if “val” in name else “train2017”
dataset_dir = path_resolver.resolve_data_path(“coco”)
dataset_annotations = dataset_dir / “annotations”
# create the libraries if needed
dataset_dir.mkdir(parents=True, exist_ok=True)

# download images if needed
if not (dataset_dir / dataset_name).is_dir():
    filename = downloader.download_file("http://images.cocodataset.org/zips/" + dataset_name + ".zip")
    with zipfile.ZipFile(filename, "r") as zip_ref:
        zip_ref.extractall(str(dataset_dir))
    Path(filename).unlink()

# download annotations if needed
if not dataset_annotations.is_dir():
    filename = downloader.download_file("http://images.cocodataset.org/annotations/annotations_trainval2017.zip")
    with zipfile.ZipFile(filename, "r") as zip_ref:
        zip_ref.extractall(str(dataset_dir))

# for pose estimation / instance segmentation we copy the json file
if "val" in name:
    anno_folder = path_resolver.resolve_data_path(TF_RECORD_LOC[name]).parent
    anno_filename = anno_folder / ("person_keypoints_" + dataset_name + ".json")
    (Path(anno_filename).parent).mkdir(parents=True, exist_ok=True)
    shutil.copy(dataset_annotations / ("person_keypoints_" + dataset_name + ".json"), anno_filename)
    anno_filename = anno_folder / ("instances_" + dataset_name + ".json")
    shutil.copy(dataset_annotations / ("instances_" + dataset_name + ".json"), anno_filename)

return dataset_dir / dataset_name, dataset_annotations / ("instances_" + dataset_name + ".json")
def run(dataset_dir, det_file, name, num_images):
if dataset_dir == “” or det_file == “”:
if dataset_dir != “” or det_file != “”:
raise ValueError(“Please use img and det arguments together.”)
dataset_dir, det_file = download_dataset(name)
img_labels_list, imgs_name2id = get_img_labels_list(Path(dataset_dir), Path(det_file))
images_num = _create_tfrecord(img_labels_list, name, num_images, imgs_name2id)
print(“\nDone converting {} images”.format(images_num))
if name == “main”:
parser = argparse.ArgumentParser()
parser.add_argument(“type”, help=“which tf-record to create {}”.format(TF_RECORD_TYPE))
parser.add_argument(“–img”, “-img”, help=“images directory”, type=str, default=“”)
parser.add_argument(“–det”, “-det”, help=“detection ground truth”, type=str, default=“”)
parser.add_argument(“–num-images”, type=int, default=8192, help=“Limit num images”)
args = parser.parse_args()
assert args.type in TF_RECORD_TYPE, “need to provide which kind of tfrecord to create {}”.format(TF_RECORD_TYPE)
run(args.img, args.det, args.type, args.num_images)
If you can help me get through this tutorial or with the conversion from onnx to HEF that would be awesome, if you have any other ideas on how to do it, I would gladly take them since my pt works and just the hef makes trouble.
Hi, if you work with yolov8s I suggest you use this example ![]() Chapter 5 - Custom Model Development and Deployment | AI ❤️ Raspberry Pi
Chapter 5 - Custom Model Development and Deployment | AI ❤️ Raspberry Pi
Hi @jiahao.li,
sry for the text overload yesterday, so you are saying that your Tutorial isn‘t meant for customized models? After looking for calb2017 and val2017 I finally found them and while val2017 got downloaded in 2 mins, calb2017 is Stil downloading since 8 hours… that‘s why I was so suprised about the 18 GB becaise I just knew that it would take nearly half a Day.
So coole you please verify that the Tutorial isn‘t meant for customized models, so I can stop the process?
Best Regards and thank you for your response!!
Yes, it is not for customized models, if you want to convert your own model, I will give tutorial about customized model in a few weeks.
2 Likes
I’m having some serious trouble with compiling my own models. Could you provide some assistance or a tutorial for pose models: No valid partition found during compile