Hi @Nadav,
I trained a yolov8s model for square boxes, can you explain further what you mean with “input” if you referring to the the camera it’s always the raspberry pi camera module 3 camera, when you mean the dataset the pictures were taken from my phone camera and the raspberry pi camera module 3 I created a data set in roboflow, my “old” Hef file got an pt model which dataset was not stretched to a square format, but the yolo training in Colab made it in a square format, I followed the following tutorial for the conversion from ONNX to HEF Raspberry Pi AI Kit: ONNX to HEF Conversion.
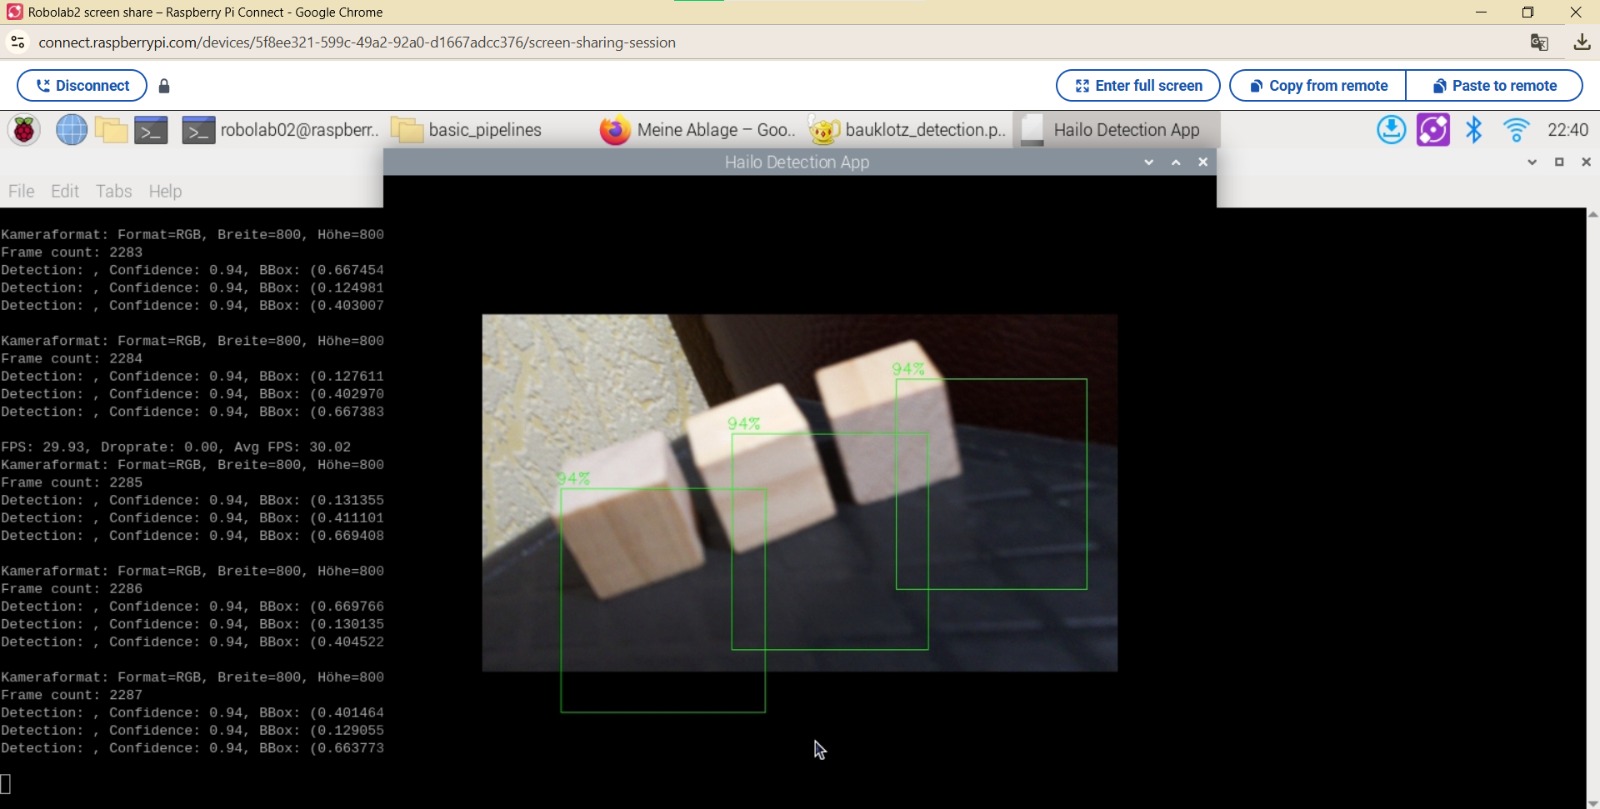
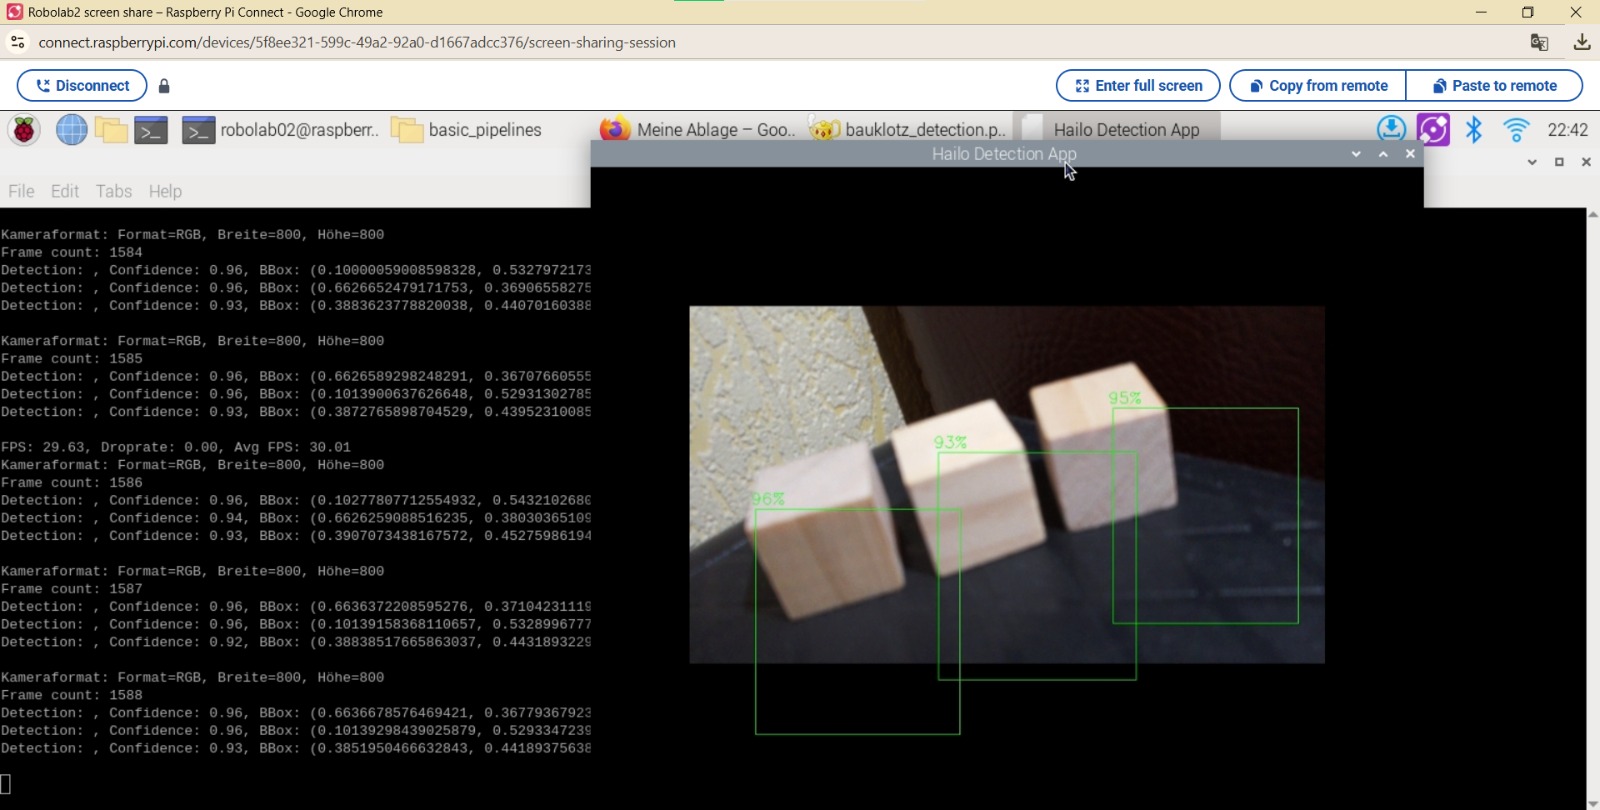
Since I didn’t use GPU the process took WSL2 with Ubuntu 22.04 3 and a half hours. So when I finally adjusted the jyson put my files in the right folders of the hailo_rpi5-examples folder, I saw the following outcome when I use the adjusted detection.py script (I am adding for you my json and detection.pipeline script):
detection.py
import gi
gi.require_version('Gst', '1.0')
from gi.repository import Gst, GLib
import os
import numpy as np
import cv2
import hailo
from hailo_rpi_common import (
    get_caps_from_pad,
    get_numpy_from_buffer,
    app_callback_class,
)
from detection_pipeline import GStreamerDetectionApp

# -----------------------------------------------------------------------------------------------
# User-defined class to be used in the callback function
# -----------------------------------------------------------------------------------------------
# Inheritance from the app_callback_class
class user_app_callback_class(app_callback_class):
    def __init__(self):
        super().__init__()
        self.new_variable = 42  # New variable example

    def new_function(self):  # New function example
        return "The meaning of life is: "

# -----------------------------------------------------------------------------------------------
# User-defined callback function
# -----------------------------------------------------------------------------------------------

# This is the callback function that will be called when data is available from the pipeline
def app_callback(pad, info, user_data):
    # Get the GstBuffer from the probe info
    buffer = info.get_buffer()
    # Check if the buffer is valid
    if buffer is None:
        return Gst.PadProbeReturn.OK

    # Using the user_data to count the number of frames
    user_data.increment()
    string_to_print = f"Frame count: {user_data.get_count()}\n"


    # Get the caps from the pad
    format, width, height = get_caps_from_pad(pad)
    # Debug-Ausgabe des Kameraformats
    print(f"Kameraformat: Format={format}, Breite={width}, Höhe={height}")


    # If the user_data.use_frame is set to True, we can get the video frame from the buffer
    frame = None
    if user_data.use_frame and format is not None and width is not None and height is not None:
        # Get video frame
        frame = get_numpy_from_buffer(buffer, format, width, height)
        frame = cv2.resize(frame, (2304, 1296))  # Originalauflösung der Kamera


    # Get the detections from the buffer
    roi = hailo.get_roi_from_buffer(buffer)
    detections = roi.get_objects_typed(hailo.HAILO_DETECTION)

    # Parse the detections
    detection_count = 0
    for detection in detections:
        label = detection.get_label()
        bbox = detection.get_bbox()
        confidence = detection.get_confidence()

        # Bounding Box-Koordinaten extrahieren
        xmin, ymin, xmax, ymax = bbox.xmin(), bbox.ymin(), bbox.xmax(), bbox.ymax()

        # Debug-Ausgabe
        string_to_print += f"Detection: {label}, Confidence: {confidence:.2f}, BBox: ({xmin}, {ymin}), ({xmax}, {ymax})\n"

        # Zeichne die Bounding Box, falls ein Frame verfügbar ist
        if user_data.use_frame and frame is not None:
            cv2.rectangle(frame, (int(xmin), int(ymin)), (int(xmax), int(ymax)), (255, 0, 0), 2)
            cv2.putText(frame, f"{label} ({confidence:.2f})", (int(xmin), int(ymin) - 10),
                        cv2.FONT_HERSHEY_SIMPLEX, 0.5, (255, 0, 0), 2)

        detection_count += 1

    if user_data.use_frame:
        # Print the detection count to the frame
        cv2.putText(frame, f"Detections: {detection_count}", (10, 30), cv2.FONT_HERSHEY_SIMPLEX, 1, (0, 255, 0), 2)
        cv2.putText(frame, f"{user_data.new_function()} {user_data.new_variable}", (10, 60),
                    cv2.FONT_HERSHEY_SIMPLEX, 1, (0, 255, 0), 2)
        frame = cv2.cvtColor(frame, cv2.COLOR_RGB2BGR)
        user_data.set_frame(frame)

    print(string_to_print)
    return Gst.PadProbeReturn.OK

if __name__ == "__main__":
    # Create an instance of the user app callback class
    user_data = user_app_callback_class()
    app = GStreamerDetectionApp(app_callback, user_data)
    app.run()
detection.pipeline:
import gi
gi.require_version('Gst', '1.0')
from gi.repository import Gst, GLib
import os
import argparse
import multiprocessing
import numpy as np
import setproctitle
import cv2
import time
import hailo
from hailo_rpi_common import (
    get_default_parser,
    QUEUE,
    SOURCE_PIPELINE,
    INFERENCE_PIPELINE,
    INFERENCE_PIPELINE_WRAPPER,
    USER_CALLBACK_PIPELINE,
    DISPLAY_PIPELINE,
    GStreamerApp,
    app_callback_class,
    dummy_callback,
    detect_hailo_arch,
)


# -----------------------------------------------------------------------------------------------
# User Gstreamer Application
# -----------------------------------------------------------------------------------------------

# This class inherits from the hailo_rpi_common.GStreamerApp class
class GStreamerDetectionApp(GStreamerApp):
    def __init__(self, app_callback, user_data):
        parser = get_default_parser()
        parser.add_argument(
            "--labels-json",
            default=None,
            help="Path to costume labels JSON file",
        )
        args = parser.parse_args()
        # Call the parent class constructor
        super().__init__(args, user_data)
        # Additional initialization code can be added here
        # Set Hailo parameters these parameters should be set based on the model used
        self.batch_size = 2
        self.network_width = 800
        self.network_height = 800
        self.network_format = "RGB"
        nms_score_threshold = 0.3
        nms_iou_threshold = 0.45


        # Determine the architecture if not specified
        if args.arch is None:
            detected_arch = detect_hailo_arch()
            if detected_arch is None:
                raise ValueError("Could not auto-detect Hailo architecture. Please specify --arch manually.")
            self.arch = detected_arch
            print(f"Auto-detected Hailo architecture: {self.arch}")
        else:
            self.arch = args.arch


        if args.hef_path is not None:
            self.hef_path = args.hef_path
        # Set the HEF file path based on the arch
        elif self.arch == "hailo8":
            self.hef_path = os.path.join(self.current_path, '../resources/yolov8m.hef')
        else:  # hailo8l
            self.hef_path = os.path.join(self.current_path, '../resources/yolov8s_h8l.hef')

        # Set the post-processing shared object file
        self.post_process_so = os.path.join(self.current_path, '../resources/libyolo_hailortpp_postprocess.so')

        # User-defined label JSON file
        self.labels_json = args.labels_json

        self.app_callback = app_callback

        self.thresholds_str = (
            f"nms-score-threshold={nms_score_threshold} "
            f"nms-iou-threshold={nms_iou_threshold} "
            f"output-format-type=HAILO_FORMAT_TYPE_FLOAT32"
        )

        # Set the process title
        setproctitle.setproctitle("Hailo Detection App")

        self.create_pipeline()

    def get_pipeline_string(self):
        source_pipeline = SOURCE_PIPELINE(self.video_source)
        detection_pipeline = INFERENCE_PIPELINE(
            hef_path=self.hef_path,
            post_process_so=self.post_process_so,
            batch_size=self.batch_size,
            config_json=self.labels_json,
            additional_params=self.thresholds_str)
        user_callback_pipeline = USER_CALLBACK_PIPELINE()
        display_pipeline = DISPLAY_PIPELINE(video_sink=self.video_sink, sync=self.sync, show_fps=self.show_fps)
        pipeline_string = (
            f'{source_pipeline} '
            f'{detection_pipeline} ! '
            f'{user_callback_pipeline} ! '
            f'{display_pipeline}'
        )
        print(pipeline_string)
        return pipeline_string

if __name__ == "__main__":
    # Create an instance of the user app callback class
    user_data = app_callback_class()
    app_callback = dummy_callback
    app = GStreamerDetectionApp(app_callback, user_data)
    app.run()
labels.son
{
    "iou_threshold": 0.4,
    "detection_threshold": 0.5,
    "output_activation": 0.5,
    "label_offset": 0.5,
    "max_boxes":3,
    "labels": [
      "Bauklotz"
    ]
}
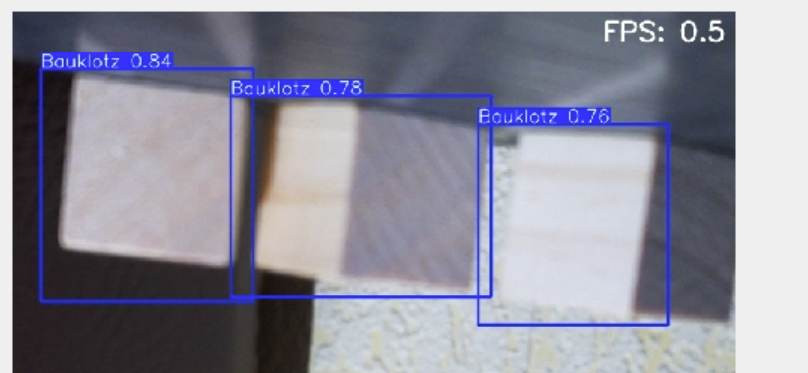
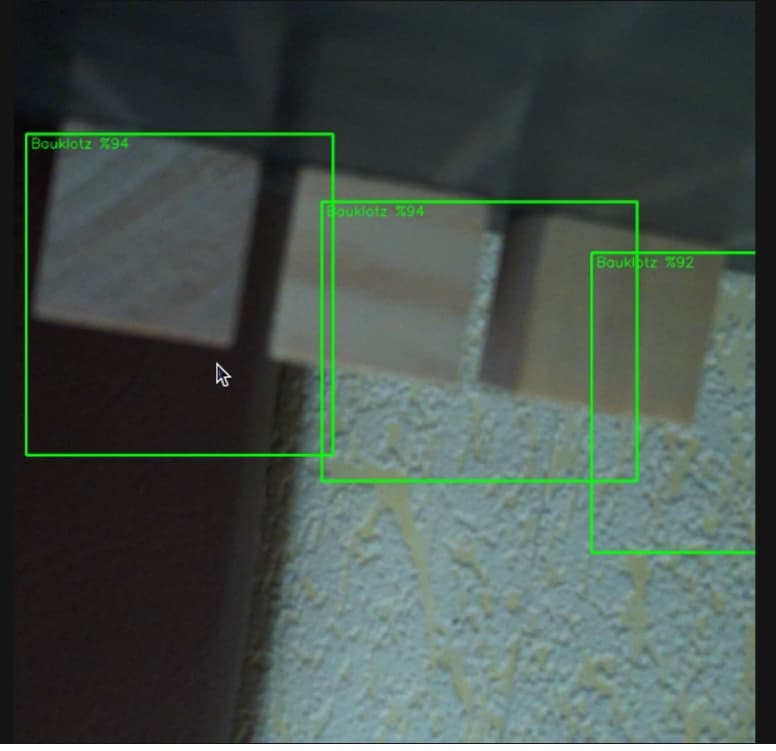
I initally thought maybe it can be a problem with the size, so I cropped all of my pictures to the format 800x800 and again trained a model had the onnx file ready, compiled it and in the end had near identical results as the other HEF File → Disoriented bboxes:
as you can see in the tutorial i linked there weren’t any alls just a “simple” command: “hailomz compile yolov8s --ckpt=cybest.onnx --hw-arch hailo8l --calib-path train/images --classes 2 --performance” , the images in “train/images” I used here were the ones I trained the model with.
I get also a bit confused to be honest, some in this forum are able to compile their model with one command like this colleague right here https://community.hailo.ai/t/how-to-modify-yolov8n-yaml-file-when-compiling-hailomz/5082/2 and other have to prepare three different files for the conversion, the nms_config.json, the yaml and another one… I really respect the people that do these kind of projects as their hobby. And I also see the fun in it but as I said, it soon will be three months since I started and I really want to end this project with a nice HEF file 
FYI: I really appreciate your answer and I really encourage others to join the community and ask their question, I regret taking so long and thinking about making an account and joining the community, I also read the other posts and you guys really make a difference and try to help, thank you for helping out!! @Nadav @omria @pierrem