I build a project which utilizes a custom yolo8-obb model to detect an airplane.On the raspberry pi itself, the model runs a bit slow in ncnn format. So I got the AI Hat+ with 26 TOPS to make it run faster but I face issues when trying to convert it into a hef file. I convert from a pt into onnx into har, then optimize it but when trying to compile the optimized har into a hef I get a” concat18 error: Agent infeasible”. Is there any way to run the obb model on the Hat? If yes then is there any conversion guide for the obb model? Also in the model zoo there are no obb models at all, will they ever be added. I would be glad to recieve help and advice on how to run the model on the hat. Thanks.
Welcome to the Hailo Community!
Please have a look at a new Oriented Object Detection example in our Hailo Application Code Examples repository. It uses the Yolov11 OBB model.
GitHub - Hailo-Application-Code-Examples - Oriented Object Detection
Hi @Yairsher,
In addition to what @Klaus said, since your model is a custom one, to get it compiled you should parse until the conv layers before the concat. This will also simplify the quantization and help the model accuracy.
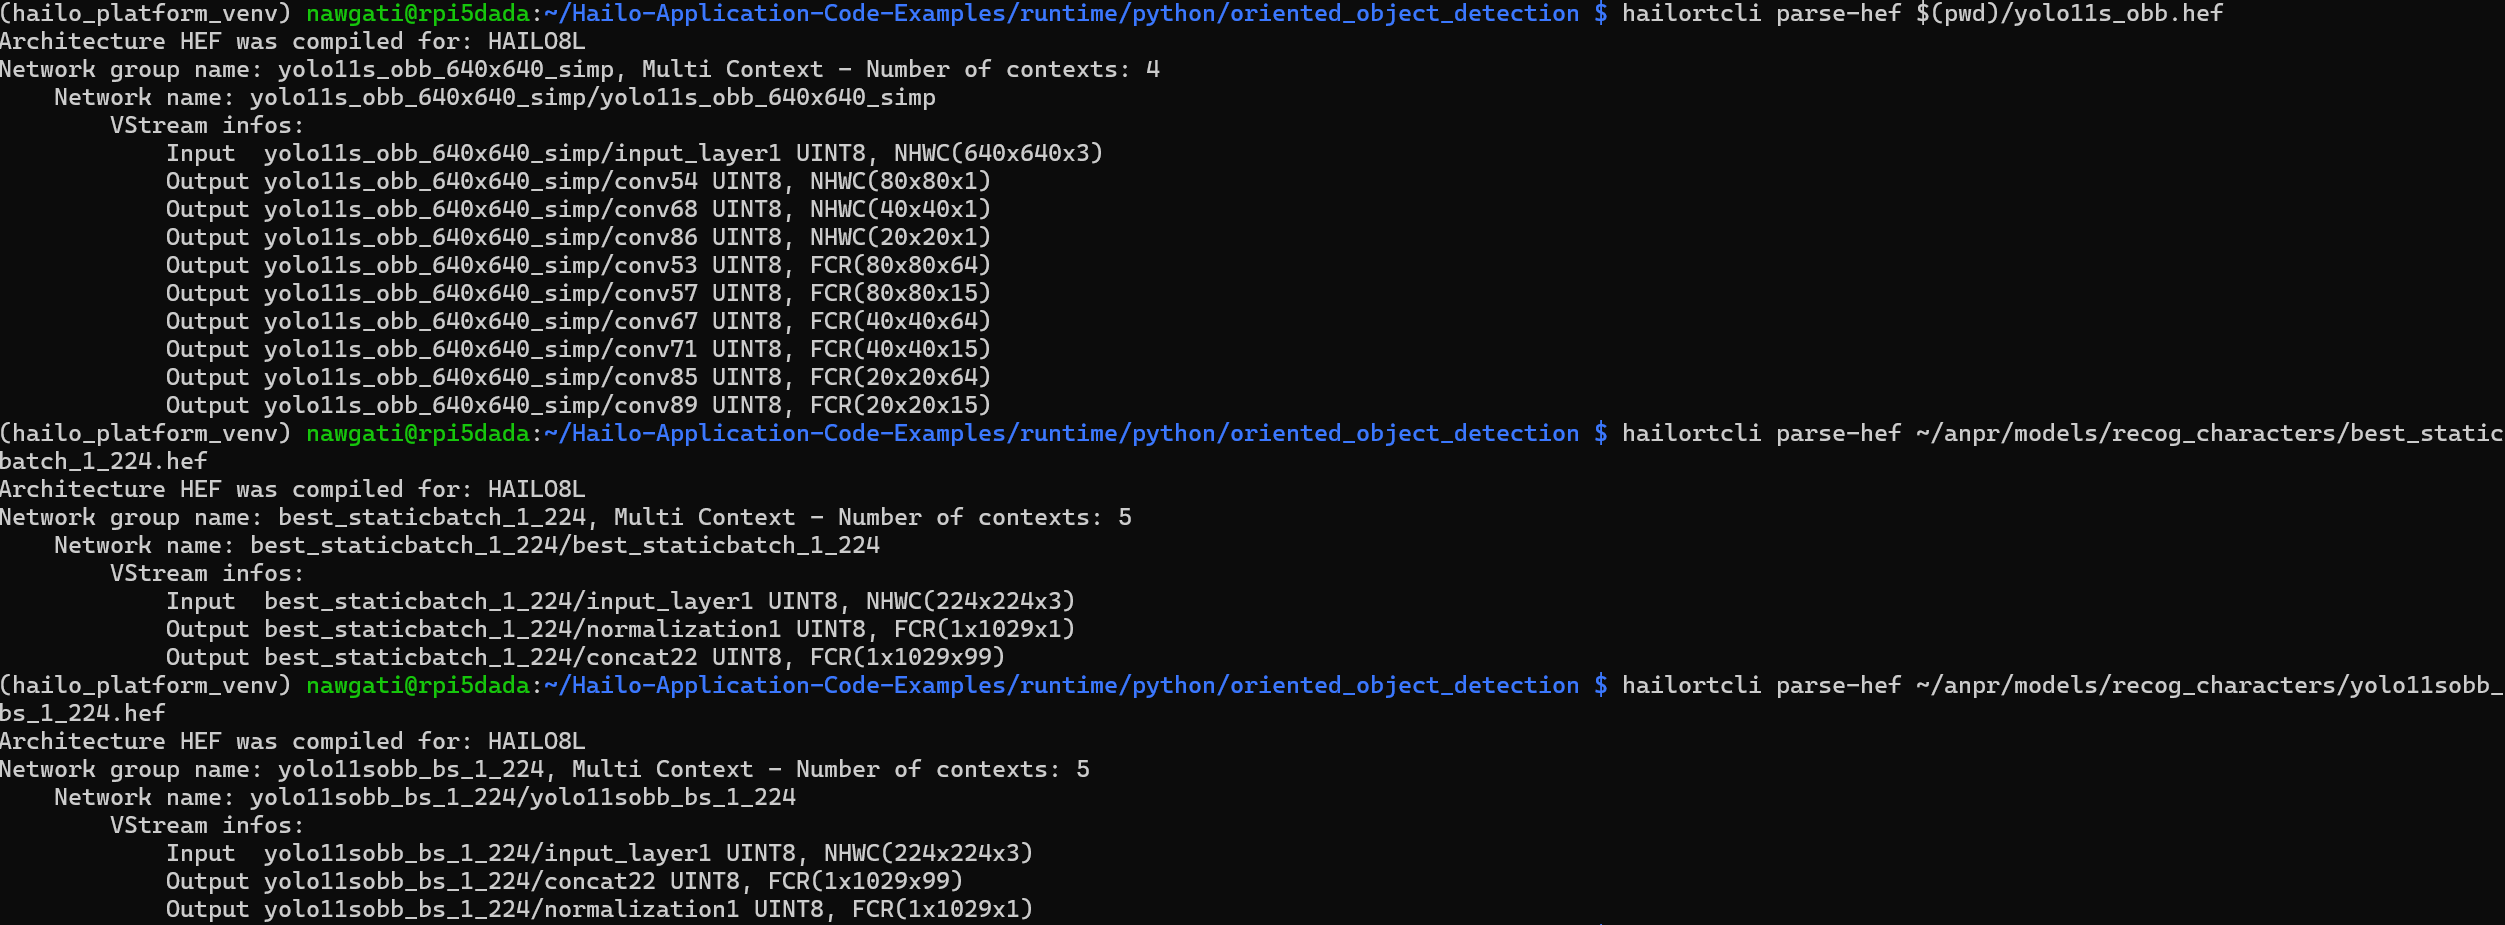
Hi! i was tryin to run my yolo11s-obb model following Hailo-Application-Code-Examples/runtime/python/oriented_object_detection at main · hailo-ai/Hailo-Application-Code-Examples · GitHub
However, the hef model that i provide seems to be different than the model that automatically downloads if i use
$ python ./oriented_object_detection.py -n yolo11s_obb -i <img_path>
Pls check the image to know the difference between the models. Am I exporting my model in a wrong way or do you guys follow some other way to export the OBB models. Kindly let me know, I’m stuck here.
@user1232 @srinivas kindly help with the issue: How to run Yolo OBB on AI Hat+ - #4 by user403
@Rishabh Welcome to the Hailo Community!
To run your own model using the Hailo accelerator, you first need to identify which layers can be executed on the accelerator and which must be reimplemented to run on the host. Typically, layers at the beginning or end of a model (commonly referred to as pre-processing and post-processing) need to be excluded from the conversion.
When parsing a model, you must use the start-node-names and end-node-names parameters to specify which nodes are included in the parsed model. All layers between these nodes must be supported by the Hailo accelerator. For more details, see the Hailo Dataflow Compiler User Guide .
Here are a few tips to help with this step:
- Use Netron to visualize model graphs (e.g., ONNX). Netron also supports Hailo HAR files.
- If you haven’t already, I recommend working through the built-in tutorials included in the Hailo AI Software Suite Docker. You can start the Jupyter Notebook server with the following command:
hailo tutorial
- Review how models are parsed in the Hailo Model Zoo, especially YOLO models. For example, to parse YOLOv8m, run:
hailomz parse yolov8m
This command generates a yolov8m.har file. You can also find the corresponding yolov8m.onnx file under:
/shared_with_docker/.hailomz/model_files/ObjectDetection/...
Compare the HAR and ONNX files using Netron. You’ll notice that the HAR file has six outputs and that the post-processing layers have been removed.
You can then apply this knowledge to your model. You can seem from the example HEF file, there are 9 outputs, they are conv layers. The names are likely different for your model.
The output image (398x46)
![]()
that i see of the plate that had to be inferenced upon looks like above.
I’m not sure what i’m doing wrong. Is there a specific way the .pt has to be exported to .onnx? I export using:
from ultralytics import YOLO
model = YOLO("/home/nawgati/anpr/hailo_setup_333/yolo11s_obb_224x224_simp.pt")
model.export(format="onnx", imgsz=224, simplify=True, dynamic=False, opset=13)
Kindly help! I edited their config.json as well to:
{
  "visualization_params": {
    "score_th": 0.35,
    "max_boxes_to_draw": 500
  },
  "oriented_postprocess": {
    "obb_model_input_map": {
      "best_staticbatch_1_224/conv53": "/model.23/cv2.0/cv2.0.2/Conv_output_0",
      "best_staticbatch_1_224/conv54": "/model.23/cv4.0/cv4.0.2/Conv_output_0",
      "best_staticbatch_1_224/conv57": "/model.23/cv3.0/cv3.0.2/Conv_output_0",
      "best_staticbatch_1_224/conv67": "/model.23/cv2.1/cv2.1.2/Conv_output_0",
      "best_staticbatch_1_224/conv68": "/model.23/cv4.1/cv4.1.2/Conv_output_0",
      "best_staticbatch_1_224/conv71": "/model.23/cv3.1/cv3.1.2/Conv_output_0",
      "best_staticbatch_1_224/conv85": "/model.23/cv2.2/cv2.2.2/Conv_output_0",
      "best_staticbatch_1_224/conv86": "/model.23/cv4.2/cv4.2.2/Conv_output_0",
      "best_staticbatch_1_224/conv89": "/model.23/cv3.2/cv3.2.2/Conv_output_0"
    },
    "img_size": 224,
    "cls_num": 35,
    "scores_th": 0.4,
    "nms_iou_th": 0.45
  }
}
Hey @user1232
I tried to follow what you mentioned and used the end-node-names parameter while parsing my model. i used the command:
$ hailo parser onnx best_staticbatch_1_224.onnx --hw-arch hailo8l --end-node-names /model.23/cv2.0/cv2.0.2/Conv /model.23/cv3.0/cv3.0.2/Conv /model.23/cv4.0/cv4.0.2/Conv /model.23/cv2.1/cv2.1.2/Conv /model.23/cv3.1/cv3.1.2/Conv /model.23/cv4.1/cv4.1.2/Conv /model.23/cv2.2/cv2.2.2/Conv /model.23/cv3.2/cv3.2.2/Conv /model.23/cv4.2/cv4.2.2/Conv
$ hailo optimize best_staticbatch_1_224.har --calib-set-path /home/nawgati/anpr/hailo_setup_333/recog_characters_yolo11s_40k_full_800epochs/calib_npy_recog_characters
$ hailo compiler /home/nawgati/anpr/hailo_setup_333/best_staticbatch_1_224_optimized.har --hw-arch hailo8l
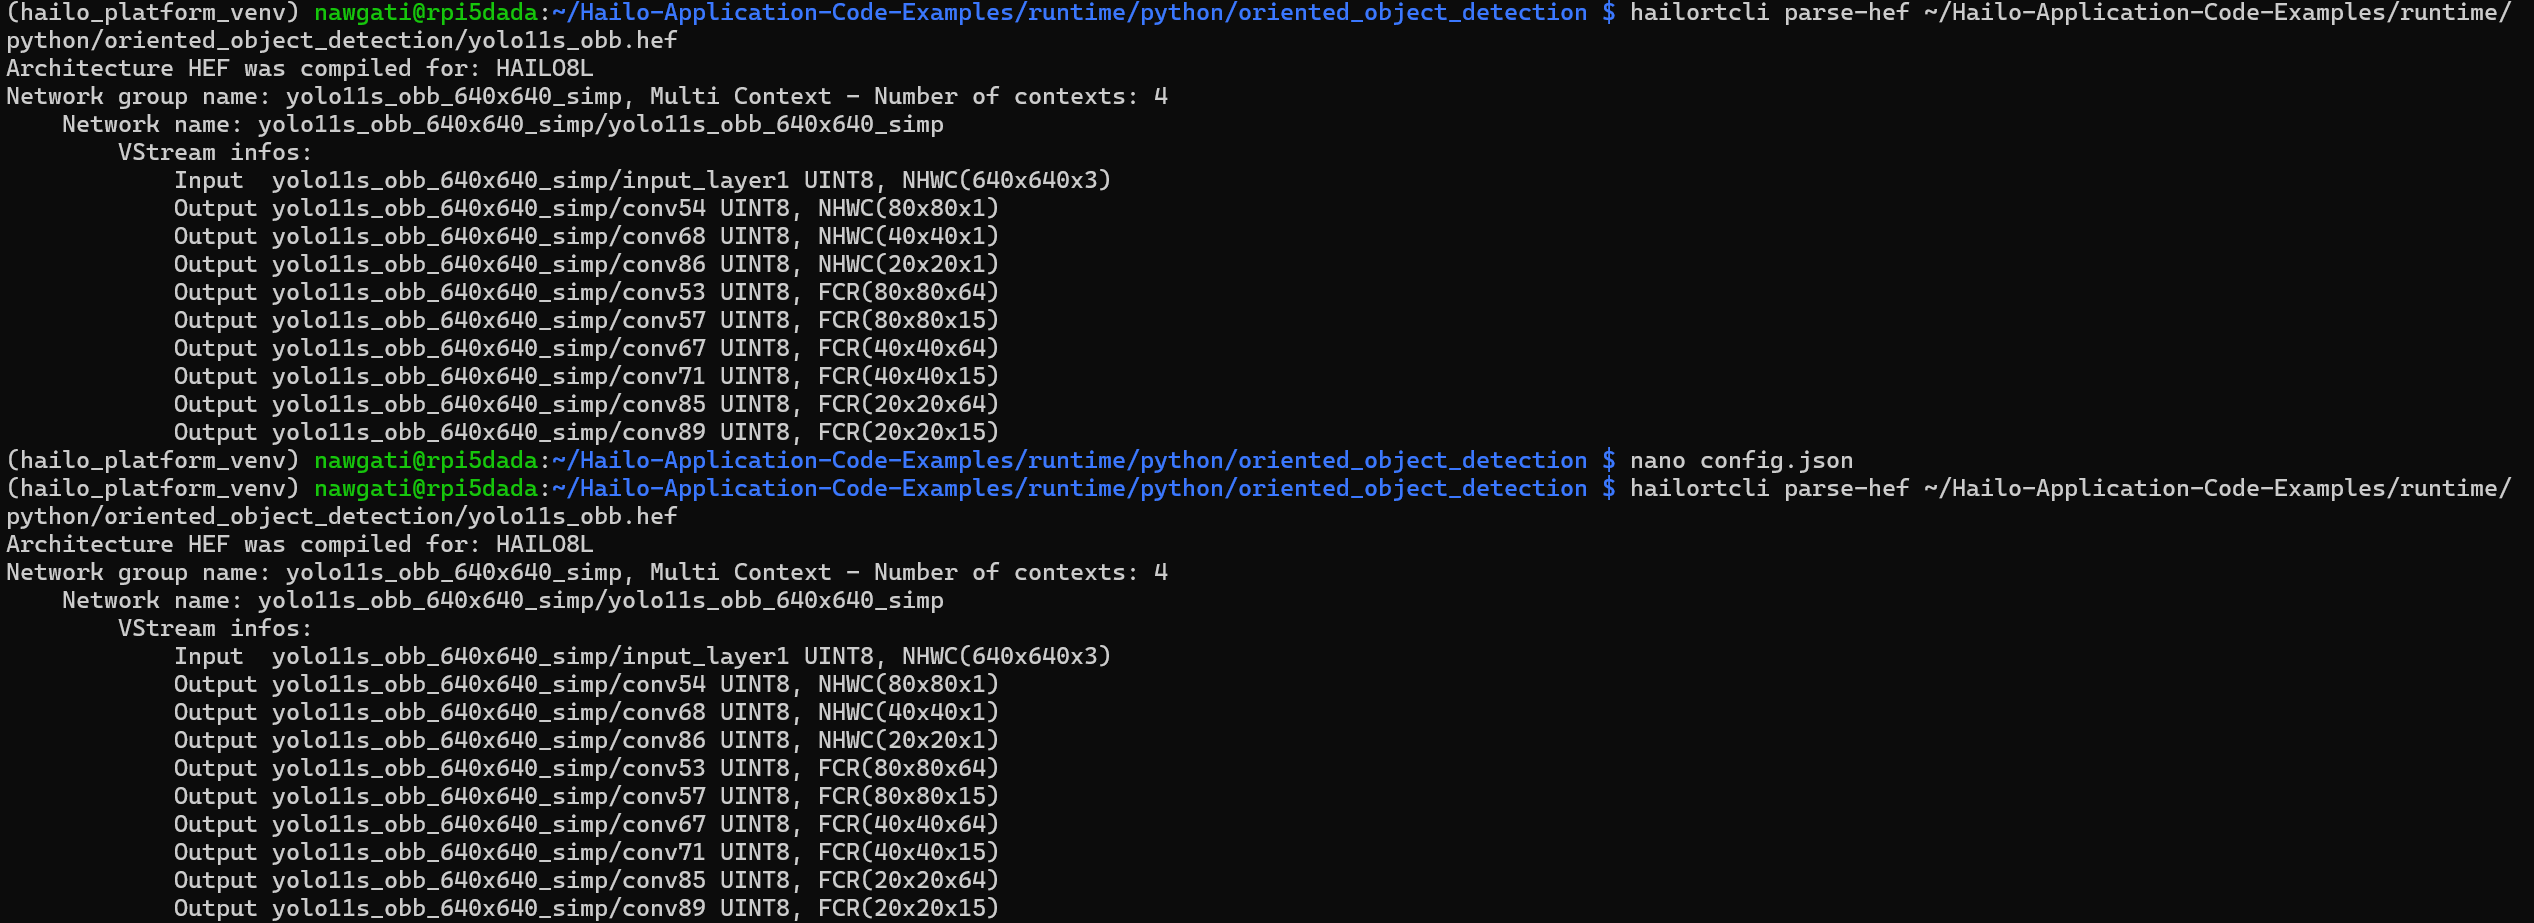
and finally i had my model but as you can see in the image the dimensions vary for best_staticbatch_1_224 (my model) and yolo11s_obb_640x640_simp (model present in Hailo-Application-Code-Examples/runtime/python/oriented_object_detection at main · hailo-ai/Hailo-Application-Code-Examples · GitHub), i get a warning you can see in the next image.